In the back of my mind I’ve been wanting to redo this tree for years. But the first batch of ornaments took me so dang long, and I always had some other goal that needed attention, so year after year it went neglected.
This year I knew it was time to address this, so I had to come up with some extra extra cheap and quick ornaments. I bought a pack of scrapbook paper made by American Crafts (Who I LOVE. They’re a great company with gorgeous designs.) and searched the internet for every kind of paper ornament I could find.
These are all crazy easy. And you can’t get cheaper than paper, so they’re perfect for a “disposable” application like changing a color scheme year to year, or, like my friend who’s getting married on December 20th, decorating a winter wedding tree.

The globe ornament is an oldy but goody that I’ve seen everywhere from Carol Duvall to Martha Stewart and at a million different websites across the internet. Here’s Martha’s latest iteration.
The ornament made out of paper strips is pretty much instinctual. In fact, as I’ve been checking out the blogs of some of you commenters, I came across these exact ornaments, in the exact same American Craft paper pack. Sorry I can’t remember who’s it was, but I got quite a kick out of seeing it. I just cut a ton of paper strips to some random size that looked good to me, punched holes in both ends, and secured them with brads. I made sure to make the inside look pretty too, so I lined up the paper strips wrong sides together before I put the brads in.
The heart is the only paper ornament that can claim any originality.

Cut four strips of paper to 12″ by 1 1/2″, and four strips of paper 8″ by 1 1/2″. I think this looks best when you use four different papers so that you end up with different patterns on each surface of the heart. But for today we’ll just go with two.
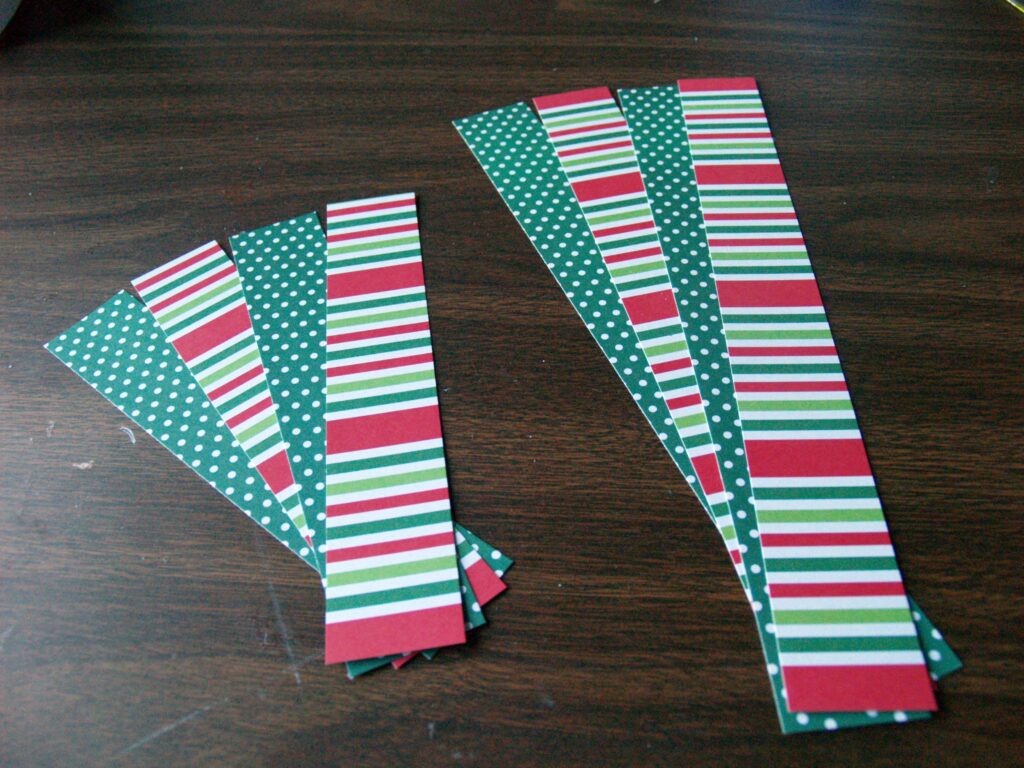
Glue two 12″ strips back to back, the other two 12″ strips back to back and then both sets of 8″ strips back to back so that you’re left with four double sided strips with different patterns on both sides.
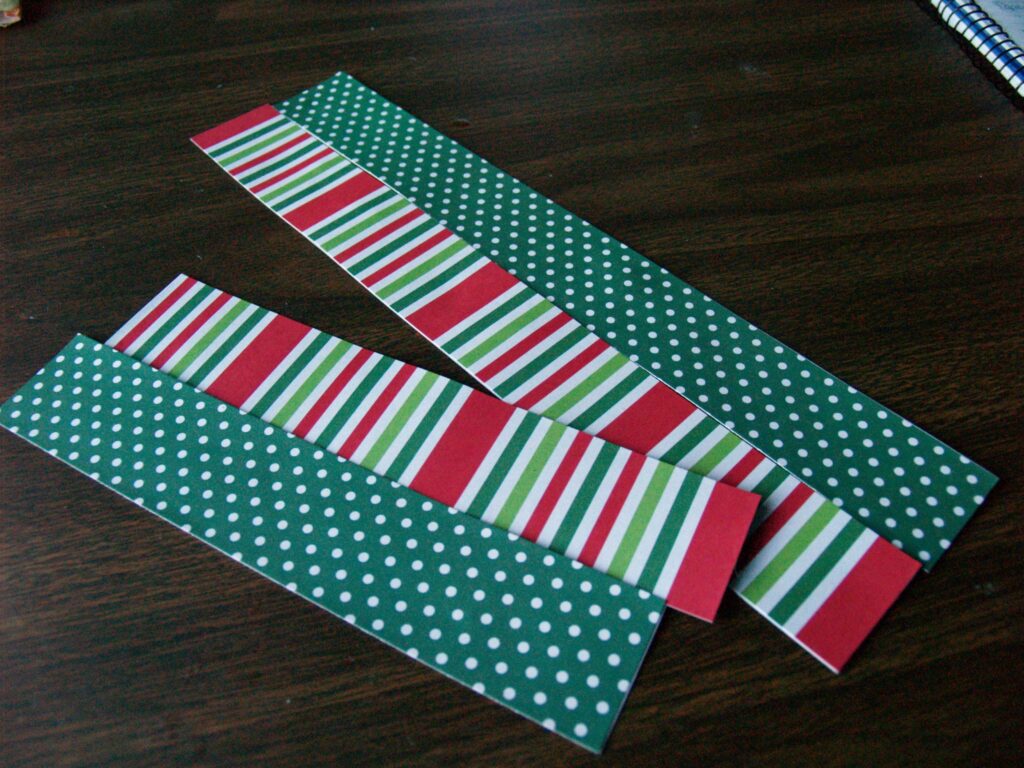
Line up all four strips to be even on one side. You have to arrange them so that when you bend them over in the next step, the patterns will all be in the right place. Put the 12″ strips right sides together (and by right sides I mean the side you want facing outside of the heart), then put one 8″ strip on each side with the right side of the 8″ strip facing the wrong side of the 12″ strip. This is one of those things that’s kind of hard to explain, but ridiculously easy in practice. You’ll see what I’m talking about as soon as you have the strips in your hands.
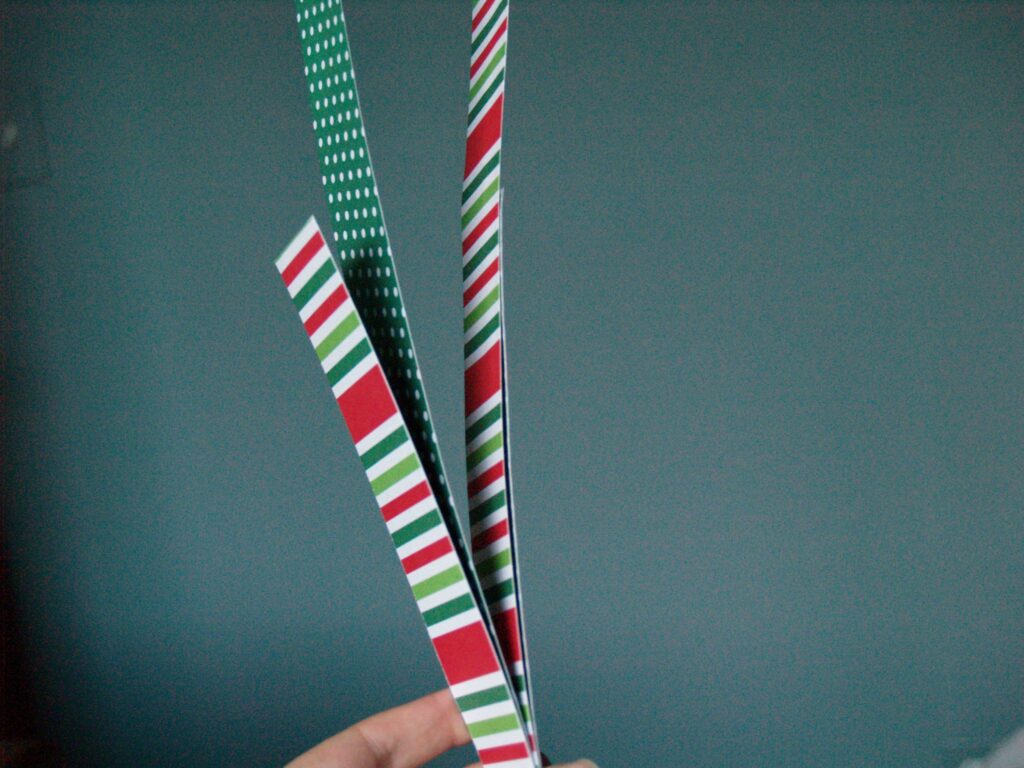
Bend the top end of each strip over to meet the bottom end where you’ve got everything all lined up together. See? There’s your heart. If you got any of your strips facing the wrong way, now’s your chance to fix them.

Secure the end with a couple staples. I covered the staple with another little paper strip, but you could also use ribbon, or just a pretty staple and leave it exposed.

I used a little glue to stick a hanger between the curves of the heart. This also had the added benefit of making the heart a little more sturdy.



Love it! headed out to hobby lobby to pick up a paper pack RIGHT NOW!… okay, maybe when the temp reaches a balmy 5, I might…Re: the globes… are they just circles folded three times and glues together?
I love the ornaments! I have been looking for homemade Christmas ornament ideas. Thanks.
Pretty much! I scored a triangle on top of the circle shape, folded them up, and then glued them all together. Each globe took eight circles total.I think that Cathie Filian has a tutorial for her version on her website too.
Oh I love that heart! Love, love, love it! You have some amazing ornament projects this week! I'll be linking.
OMG, totally LOVE this heart ornament! We keep up our white glittery Christmas tree for Valentine's usually and I'll totally make these with my girls to decorate it…what a great idea! When I do get around to it, I'll definitely give you some linky love…thanks for sharing 🙂
These are great paper ornaments children could do too…I"m thinking tho I'd love to take plain cardstock and paint designs of my own on the strips making them a little more personal..thanks so much for the info…
These are really cute. I think I will make some to dress up some christmas gifts.
You could also use heat-n-bond to fuse two layers of fabric together. Then cut strips out of the fabric to make the hearts. The gooey stuff in the fuser will keep the fabric from fraying and the possibilities in fabric are endless. I'm going to be making some of these!
Oh today will be a happier day for me because I just visited your site for the first time and am enchanted. I will for sure try these little cuties. Nothing says Christmas Tree like a new batch of paper ornaments. Last year, I did stars from gold and white papers and embelished with all sorts of thingies. Peace to you/
It's amazing what beautiful paper can do for a simple design.Another couple ideaspaper porcupine balls (paper spikes all over, very cool):http://www.thriftyfun.com/tf54541769.tip.htmlfive pointed origami star:http://extremecards.blogspot.com/2009/06/five-pointed-origami-star.htmlI've been making these since I was a kid…Scandanavian woven paper stars:http://www.canadianliving.com/crafts/other_crafts/woven_star.phpCarol
Beautiful!I posted on my Blog about your paper heart and linked to your Site. I hope that was ok? Holly
Thank you for a lovely tutorial, Merry Christmas.
What a simple but very cute idea!! And great for all those scraps I don't know what to do with.
Awesome. Very creative OI am sure our grand kids would have fun making these.
These would be nice made with Valentine's paper. Thanks for sharing. I've posted a link.
Hi Tresa,
These are GORGEOUS!
I am going to feature them on the 1 October on "Christmas Get Crafty" over at Red Ted Art (doing it so early, so people have time to be inspired AND Make!)
Hope that is ok. Here is last month's Yellow Get Crafty as a reference! http://www.redtedart.com/2010/09/01/get-crafty-yellow-september-2010/
Thank you!
Maggy
Felicitaciones, esta precioso todo lo que nos comparten, quisiera recibir en mi correo todo sus trbajos. Porfavor suscribanme. gracias.
Thanks for this – I'm doing a roundup of handmade Christmas ornaments on my blog over the next few days and putting up a link to this tutorial.
These are so sweet! I made one for our tree and blogged about it…linking back to you! Here it is: http://sittingatourkitchentable.blogspot.com/2011…
Thank you for sharing! And Merry Christmas!!!
We're making these this year for my annual ornament making party. Thanks !
Thanks for sharing your thoughts. I truly
appreciate your efforts and I will be waiting for your next write ups thanks
once again.
It’s in point of fact a nice and useful piece of information.
I am satisfied that you just shared this helpful information with
us. Please keep us up to date like this. Thanks for sharing.
Thanks for your personal marvelous posting! I actually enjoyed reading it, you will be a great author.I
will remember to bookmark your blog and will eventually come back from now
on. I want to encourage one to continue your great job,
have a nice morning!
This piece of writing is in fact a pleasant one it helps new internet visitors,
who are wishing for blogging.
constantly i used to read smaller articles that also clear their motive, and that is also happening with this article which I am reading at
this time.
We stumbled over here coming from a different website and thought I may as
well check things out. I like what I see so
now i’m following you. Look forward to looking over your web page repeatedly.
Wow, that’s what I was searching for, what a information!
present here at this web site, thanks admin of this web site.
I visited many websites but the audio feature for audio songs current at this web site is genuinely
fabulous.
Magnificent website. Lots of useful information here.
I’m sending it to a few buddies ans additionally sharing in delicious.
And naturally, thanks for your effort!
Magnificent site. Plenty of useful information here. I’m sending it to several pals ans also
sharing in delicious. And obviously, thanks on your effort!
It is truly a nice and helpful piece of info. I’m glad that you just shared this useful information with us.
Please stay us up to date like this. Thank you for sharing.
Pretty much! I scored a triangle on top of the circle shape, folded them up, and then glued them all together.
You could also use heat-n-bond to fuse two layers of fabric together. Then cut strips out of the fabric to make the hearts.
Pretty much! I scored a triangle on top of the circle shape, folded them up, and then glued them all together. Each globe took eight circles total.
I love this. doing it now. Thank you
Thank you for this simple but beautiful ornament. Just what we need for a craft day at home!
https://jant-mamlka.com/%D8%AA%D9%86%D8%B8%D9%8A%…
https://jant-mamlka.com/%D8%A7%D8%B1%D8%AE%D8%B5-…
nice one
I wanted to let you know I loved your idea! I included it in my post “40+ Christmas Countdown Activities Jar {Free Printable}”. If you would like me to include an image- to encourage viewers to click through and pick this one out of the options I listed- you can leave a comment on the blog post: https://www.thehousewifemodern.com/blog/christmas… or e-mail me at jennie@thehousewifemodern.com.
Thanks! This was a beautiful idea and I hope my readers like it.