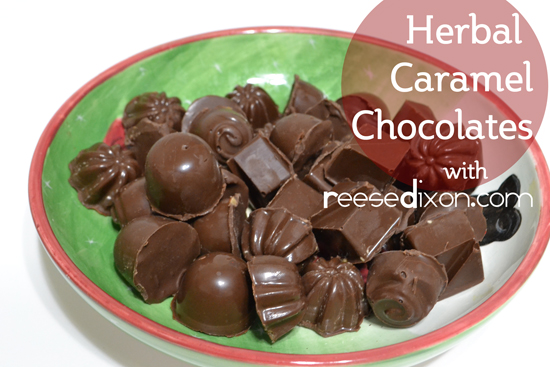
When I was a kid we used to make those microwave wilton chocolate candies for everything. We’d pull out the box full of molds my mom had stuffed in a back cabinet from the week she decided she was going to take up chocolate making, we’d rescue some ancient chocolates from another pantry, and we’d laboriously paint with melted “chocolate” to make little gobs of something that tasted like wax. All the fun was in the making, but now that I’m older and snobbier about my chocolate, I want to make something that is worth the trouble. I’ve been intimidated by chocolate but there’s really no need. It’s way easier than I believed. You just need a thermometer.
For my filling I wanted to make an herbed caramel. Some of my favorite Chocolate Artisans (that’s what they call themselves) make caramels infused with rosemary and lavender and brandy and a whole bunch of other not sweet concoctions. So far, the weirder they are the more I like them, so I had to try my hand at my own version.
To add a flavor to the caramel there are a few different ways you could go. You could just chop up bits of whatever and toss it in and you’ll get a crunchy texture, or you could infuse it by melting the butter and then soaking the flavor item in the butter until it took on the flavor, or you can just go straight to adding a few drops of flavored oils – making sure they’re food grade of course. I tried a few options and I found the oil almost fool proof, while the other ways took more finesse than I seem to possess.
Caramel Filling
4 T butter flavored as desired
1/2 C half and half
1 C brown sugar
Over a gentle heat let this all melt together, whisking frequently. Don’t let the sugar burn or the milkfats cook. When it gets to be the consistency of a good caramel sauce, take it off the heat and let it cool.
Meanwhile, prepare your chocolate. If you just melt it and mold it it will taste fine, but if you want that beautiful shiny coating the fine chocolates have you want to take the time to temper your chocolate. This just refers to a heating process that creates the most preferable texture, and has to do with how molecules line up. It’s a simple three step process.
1.)In a bowl that sits over a pot of water, you melt the chocolate until it’s about 115 to 120 degrees.
2.) While stirring, add unmelted chocolate pieces until it cools down to around 81 to 83 degrees. Remove any chocolate pieces that remain unmelted.
3.) Return the bowl to the heat and bring it slowly back up to the working temperature – 86 – 89 degrees.
When your chocolate is tempered pour it into the molds. After much watching of youtube videos, I found that the paintbrushes I used to use as a kid are for suckers. The better way to get a coating on the molds is to fill it up completely, then flip the mold over and let it drain onto a rack or back into a bowl. You’ll get a beautiful thin even coat. Let that set up thoroughly.
The caramel needs to be cool enough to not melt through the chocolate and warm enough to pour. Room temperature is ideal. Fill the molds up, but resist the urge to overfill it. Top with more chocolate and use a metal spatula to scrape off any excess and leave the clean edge.
I was not super clean when I was making mine, I went through a whole lot of trial and error to get the caramel flavorings down and I just had no more patience for doing things the right way that day. But I still found the experience pretty empowering. Chocolate making isn’t that hard, you guys! If you passed seventh grade chemistry, you can totally make beautiful shiny chocolates.


This is out and out apathetic and decreases you to a negligible copycat! Maintain a strategic distance from this when composing school essays as it costs you a ton of imprints.