The timing of this project is just too good to resist. I’m still cranking out tutorials for my big bedroom makeover, and after last weeks big announcement, I knew the next project just had to be this one. After sharing that I’ve been diagnosed with MS I got such overwhelming support and love that I had to hide a little bit. It was almost too much to take in. I feel so loved and encouraged and I’m once again endlessly grateful for this community of readers and friends I’ve got backing me up. You all are the very best and I can’t thank you enough.
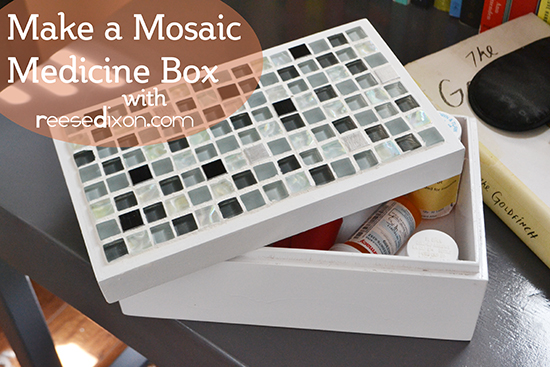
Even before the MS diagnosis I had a world of pills by my bedside. My health has been a problem for a very long time which means that I’ve got sleeping pills and pain pills and mental health pills and so many more all crowding my bedside table. It took up a ton of space, it was an ugly eyesore, and I really don’t need the visual reminder of how much is wrong with me. I needed to solve this problem and make it beautiful, so I made myself this mosaic box. Now I can stuff all the medicine away until I need it and just keep myself surrounded by pretty.

I found this box at Target, but just about any box will do. This one was light wood with an inlaid blue plastic top, but it was on clearance and I knew I could do something with the rim around that top, so I snatched it up and spray painted the whole thing white. Because of the materials it was made of I started by spray painting on a primer, and then following that with a couple coats of glossy white.

Spread a tile adhesive across the top of the box and lay your tiles in position, spacing them evenly across the top. I bought my mosaic tiles at Home Depot so they came preinstalled on a mesh backing that automatically spaces them for you. Since I had to keep my tiles inside that rim and I didn’t want to have to cut any in half, I cut the tiles off the mesh backing so I could space them as close together as I needed to to make them fit evenly. I put a tile in each corner and then filled in the sides to get the spacing right, then just filled in the middle by following the spacing in the finished rows. Clean up any excess glue before it dries and let it set for at least a full 24 hours.

With the glue dry it’s time to add the grout. I used a non-sanded grout because that’s the kind that works best when the spaces between the tiles are very small. Add water to the grout until it’s the consistency of frosting. Spread it over all the tile with a float or putty knife, making sure that the grout gets worked all the way down between each tile. Let it dry for around 15 minutes or so, and then use a wet sponge to clean the majority of the extra grout off of each tile. Just focus on removing big globs, don’t try and get the tile too clean yet. Until it’s drier it will be impossible and you’ll just wash your grout away. Run your finger along the outside edge to create a nice smooth finish. After letting the grout dry for another 15 minutes, come back with a dry sponge or a piece of a foam pool noodle and buff the leftover grout haze off the tile. Let the whole thing cure for at least another 24 hours before disturbing it.

I love how clean and crisp this box looks. Mosaics just look so elegant to me, and such a vast improvement from the row of bottles I had before. A row of bottles that would inevitably get knocked over by a cat or my sleepy hands and wide up scattered on the floor. Plus, I always feel better when my spaces are beautiful. Having a box like this for all my pills is like taking a shower and getting into fresh jammies when you’ve been sick for awhile. You start to feel a little more like your old self and that there’s a world beyond being sick. In that weird overthinking way I have, this box actually gives me hope.


Quite innovative and cheapest writing services idea you have shared with us about medicine box. Your skills are amazing and that grabs my attention. As I’m looking for the creative art work to learn and visit lots of others website as well. I found your website pretty acknowledging and helpful thanks for having this.